


The SDrive-MAX is an Arduino based floppy disk and cassette drive emulator for the Atari 8-bit range of computers. The SDrive-MAX allows you to read and write ATR and CAS files on real Atari hardware as though they were real disks and cassettes. The SDrive-MAX can load executable XEX files as if they were on read-only bootable disks, and can match the timing of both the 810 and 1050 floppy disk drives, allowing it to load ATX flux copied disks with copy protection still in place. The SDrive-MAX software is still in active development.
The Making part is the longest (by far!) as there are so many possible routes. Each section is self contained so you can skip forward without missing anything important. If after reading all of this, you still feel that making the SDrive-MAX is too complicated, at the end of the page is a list of all the community members who sell devices pre-made, or in kits.
The History of the SDrive-MAX
Back in 2008, Bob!k (Robert Petružela) & Raster (Radek Štěrba) of CPU, created the original SDrive. It won the Abbuc hardware contest that year and the schematics, source code, and designs were all released publicly. This spurred the creation of a couple of improved versions; the SDrive-NUXX in 2009 by c0nsumer, the SDrive Micro in 2012 by santosp, the SDrive-NG in 2014 by kbr and the SDrive2 in 2017 by alsp. The SDrive-NG led to the creation of the SDrive-MAX in 2017 by kbr.


Making the SDrive-MAX
The SDrive-MAX is a simple device to make, there is a little soldering but nothing above beginner level. By default the SDrive-MAX ties up the SIO bus of your Atari; no other devices plugged in to SIO will work. There are simple workarounds for that, which will make the SDrive-MAX a good neighbour, but it does require a little more effort to make. It’s up to you to decide if you want to put that effort in.
Apart from the 3D printed stuff, all the parts can be acquired from Amazon, eBay, Aliexpress and other similar stores in most localities around the world.
Arduino
Any Arduino UNO R3 should work, but there are lots of variations, some are easier for making an SDrive-MAX, some are harder work. Here’s a table with a few variations.

I will be covering the Arduino at the top of the Gooduino column, and the Bestduino at the bottom, as they are two distinctly different builds. The rest should be similar to the Bestduino in implementation. The Arduinos in the Baduino column would all work but for various reasons they are a pain to use.
Screen
Which screen you can use is dictated by the chip the screen uses as a driver. The SDrive-MAX software supports five different driver chips, the ILI9341, ILI9340, ILI9329, HX8347i, and HX8347g. The problem is, finding out which chip is used by a given screen, usually involves buying the screen and trying it. Elegoo 2.8″ TFT displays are recommended by the project developers and indeed I’ve had good experiences with the Elegoo display myself. I’ve had two MCUFriend displays, neither of which had working touch panels, other people have similar experiences. Other people have used 2.4″ displays with success but there are currently no free 2.4″ cases designs available. Search for the chip name along with your “UNO Screen” search term, I’ve found the ILI9341 is very common.
Case
If you have a 3D printer you can download the STL files for a few different cases here.


I have also made some SDrive-MAX Cases, you can see (and download) those, here.

If you need to get a case printed, there are lots of places online that can print for you, for example iMaterialise.
SIO Connector
If you have a 3D printer you can download the STL files for an SIO connector from Thingiverse. The crimps required are Molex “KK 396” Crimp Terminals and you’ll need a compatible crimp tool (SN-28B) if you don’t already have one.
Cable
Any flex cable with 5 or more cores of 20-24 AWG wire will work. You could cut an old SIO cable in half to get the required cable/connector but you will have a lot of unused wires that you will need to lose somewhere so it’s not advisable. I tried using an old network cable and it works fine but is a bit stiff!
Micro SD Card
Any micro SD or SDHC card should work fine, it doesn’t need to be too big, everything ever released for the Atari will easily fit inside 8GB, format the card as FAT32.
Optional Extras
As I said earlier it is possible to make the SDrive-MAX play nice with other devices on the SIO bus. If you wish to do the extra work involved in making that happen you will also require one of these.
- If you are using a Genuino style UNO with a socketed DIP chip on it you may want to get an SPDT switch for firmware updates and a Schottky diode (1N5819 or similar).
- If you are using a Bestuino or similar with an SMD mounted chip on it you may want to make yourself an UNO2SIO.
If you wish to power your SDrive-MAX from an external power supply instead of from your Atari, you will need an Arduino compatible power supply as well. Be aware that if you do this, you should NOT connect pin 10 on the SIO port (the line marked in RED in the diagrams below)
Assembly

This is the SIO connector, it’s a remarkable design considering its age. This is a distant forefather of the USB connector; Joe Decuir worked on the design of both.
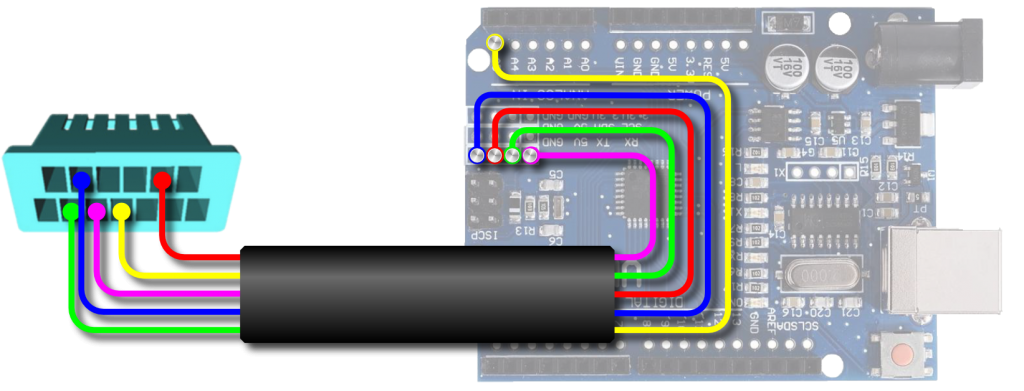
The Bare Minimum
You will need to connect up five of the contacts on this plug, that is all. Just TX, RX, Command, +5V and Ground. That remains true no matter what version of the SDrive-MAX you decide to make. At its simplest, all you have to do is solder the five wires to the right point on the UNO board.

Fixing the SDrive-MAX SIO issue.
DIP Version
With the DIP version of the SDrive-MAX, to allow other devices on the bus to be heard, you need to remove the chip from its socket, bend leg 2 out straight (carefully, it can break easily), and push the chip back into the socket. Then you can wire up the board like this.

If you ever want to update the firmware of the DIP style SDrive-MAX you will need to desolder the leg on the chip and connect it back to the socket it came out of. The risk of breaking that pin increases every time you do that, so you could install a switch like this.

SMD Version
For the SMD version of the SDrive-MAX you will need the extra UNO2SIO board. It has been designed to fit the “Bestduino” board design, and tries to simplify the entire process as much as possible.
You will need to solder a pin header to the UNO board in the first set of pin holes next to the 6-pin AVR connector before you can install this.

Bridge the “SIO SW” pins if you are powering the SDrive-MAX from the Atari, leave it open if you are powering from external power. You could fit a switch if you want to have a choice.

After you’ve done all that, you should have a finished SDrive-MAX waiting for you to program it with the SDrive software.
Programming the SDrive-MAX
Once you have built your SDrive-MAX, it will need to have the SDrive-MAX software on it for it to work. You can get the latest release of the software from the GitHub page of the developers. The latest release is always at the top, you want the zip file from the assets section. Download it and unzip it; you will find some documents and five folders named “atmega328-<screen-driver>“. Pick the folder with the right driver for your screen. If you don’t know which driver your screen uses, it doesn’t matter, you can just do this for each folder in turn until you get the right one, you cannot brick your SDrive-MAX by doing this.
For Windows
- Get XLoader and install it
- Plug the SDrive-MAX into your PC, it will install any required drivers.
- Run xLoader and select the COM port your SDrive-MAX is attached to.
- Select UNO from the device list, The baud rate can be left at default.
- Find the
eeprom_writer.hexfile in the correct SDrive-MAX folder and click ‘Upload’ - Find the
SDrive.hexfile in the correct SDrive-MAX folder and click ‘Upload’
For macOS
- Install avrdude using Homebrew (See https://brew.sh if you don’t have homebrew)
brew install avrdude - Plug the SDrive-MAX into your PC
- Identify the serial port your SDrive-MAX just created (
ls /dev/{tty,cu}.*will list the serial ports) - Type
avrdude -p m328p -b 115200 -P <serial port> -c arduino -U flash:w:<location-of-eeprom_writer.hex> - Type
avrdude -p m328p -b 115200 -P <serial port> -c arduino -U flash:w:<location-of-SDrive.hex>

For Linux
- Install avrdude using your distributions package manager
- Plug the SDrive-MAX into your PC
- Identify the serial port your SDrive-MAX just created
- Type
avrdude -p m328p -b 57600 -P <serial port> -c arduino -U flash:w:<location-of-eeprom_writer.hex> - Type
avrdude -p m328p -b 57600 -P <serial port> -c arduino -U flash:w:<location-of-SDrive.hex>
Your SDrive-MAX should spring to life and present you with the first screen calibration cross. Tap each cross in turn, it will change colour and the next cross will appear. When you have done all four crosses the SDrive-MAX will give you the screen coordinates. Tap the screen to finish and the SDrive-MAX display should appear, ready for you to use. Copy the file sdrive.atr from the SDrive-MAX software folder to the root of the microSD card and put it in the SDrive-MAX.
File Order
When you add your ATR, XEX and CAS files to the SDrive-MAX microSD card, the order they are added to the card is the order they will appear in the menus; the SDrive-MAX does not sort the file names. If you would like to get your file list alphabetical you can use a tool called FATSort, it runs on Linux/Mac and can be found here, Mac users who use Homebrew can just enter brew install fatsort into a terminal window. There is a Windows program called DriveSort which does a similar thing available here.
Using the SDrive-MAX
The SDrive-MAX can be controlled either by the touch screen on the device or directly on the Atari. By default “D0:” is enabled, this will make the Atari boot to the SDrive menu.
Controlling the SDrive-Max from the touchscreen.
Here are all the buttons you can press on the touchscreen interface, the ones I haven’t highlighted should be self explanatory.

Controlling SDrive-Max from the Atari
It’s possible to control almost every aspect of the SDrive-MAX from the Atari menu program. If you are powering your SDrive-MAX from your Atari, and your Atari doesn’t have a mod installed that can reboot without cutting power, it is the only way to boot from a disk on the SDrive-MAX without saving your settings using the “SaveIm” button in Cfg.

There are more functions you can access from the SDrive manu, I’ve tried to include all the most used ones, if you’d like to know about all the other options, please see the original SDrive documentation at the end of the page.
It has been discovered that there is a bug in the menu on the sdrive.atr image that keeps the “Find” function from working on the Atari 800 series, it was written for XL/XE machines and the key table is different. Here is a fixed version for Atari 800 users, just replace the sdrive.atr in the root of your microSD card with this one.

Loading a disk
External Power
Your Atari should be off and your SDrive-MAX should be on. Tap on the disk icon on one of the empty drive slots and find the disk you want to load in the file selector. The disk will be added, activated and marked as D1. Add any other disks the same way, they will all become the active disk as you add them, so make sure you tap the boot disk in the middle of the line to make it D1 when you are done. Now just turn on your Atari and it should boot from D1. Remember, a lot of software needs BASIC disabled; if yours does, you should hold down the Option button as you turn on the Atari.
Atari Powered
Turn your Atari on and wait for it to boot to the SDrive-MAX menu. Tap on the disk icon on one of the empty drive slots and find the disk you want to load in the file selector. The disk will be added, activated and marked as D1. Add any other disks the same way, they will all become the active disk as you add them, so make sure you tap the boot disk in the middle of the line to make it D1 when you are done. Now press Reset on your Atari and it should boot from D1. Remember, a lot of software needs BASIC disabled; if yours does, you should hold down the Option button as you press Reset.
Loading a Cassette
External Power
Your Atari should be off and your SDrive-MAX should be on. Make sure all the drives are disabled, some cassettes will not load if a disk drive is present. Press the “Tape:” button and select the CAS file you want to load. Press and hold down the Start button on your Atari as you turn it on; if you need to disable BASIC, hold down Option as well. The Atari will power up and make a *burp* noise, when it does, press any key on the Atari and press the Start button on the SDrive-MAX. If the Cassette is a multi stage load cassette, you will need to pay attention for the message to load the next stage, as the SDrive-MAX does not have a motor control line, so it cannot auto stop/start the tape.
Atari Powered
Turn your Atari on and wait for it to boot to the SDrive-MAX menu. Make sure all the drives are disabled, some cassettes will not load if a disk drive is present. Press the “Tape:” button and select the CAS file you want to load. Press and hold down the Start button on your Atari as you press Reset; if you need to disable BASIC, hold down Option as well. The Atari will reboot and make a *burp* noise, when it does, press any key on the Atari and press the Start button on the SDrive-MAX. If the Cassette is a multi stage load cassette, you will need to pay attention for the message to load the next stage, as the SDrive-MAX does not have a motor control line, so it cannot auto stop/start the tape.
Where to Buy an SDrive-MAX
I genuinely believe there is no need to buy an SDrive-MAX. It’s an easy and fun project that even complete novices can have a go at. The skills and tools required are cheap and easy to use; a working one can be made in less than an hour (3D printing aside), but I understand some people just do not want, don’t have the time, or aren’t confident enough to tackle a project like this. For those people, eBay (or Google) has the answer.
Further Reading
- SDrive-MAX’s page on the Atari Wiki
- SDrive-MAX’s GitHub Repo
- The main discussion at atariage
- The main discussion at abbuc
- The main discussion at atarionline
- The main discussion at forum64